第一部分 搭建https服务器---前奏
首先需要理解几个概念

HTTPS
HTTP是一个网络协议,是专门用来传输 Web 内容;
SSL(Secure Sockets Layer)的缩写----“安全套接层”。它是在上世纪90年代中期,由网景公司设计的。 为啥要发明 SSL 这个协议?因为原先互联网上使用的 HTTP 协议是
明文的,存在很多缺点——比如传输内容会被偷窥(嗅探)和篡改。发明 SSL 协议,就是为了解决这些问题。到了1999年,SSL 因为应用广泛,已经成为互联网上的事实标准。IETF 就在那年把
SSL 标准化。标准化之后的名称改为 TLS(是“Transport Layer Security”的缩写),中文叫做“传输层安全协议”。通常所说的 HTTPS 协议,说白了就是
“HTTP 协议”和“SSL/TLS 协议”的组合。你可以把 HTTPS 大致理解为——“HTTP over SSL”或“HTTP over TLS”。OpenSSL是TLS/SSL协议的开源实现,提供开发库和命令行程序。
很多相关的文章都把这两者并列称呼(SSL/TLS),因为这两者可以视作同一个东西的不同阶段。
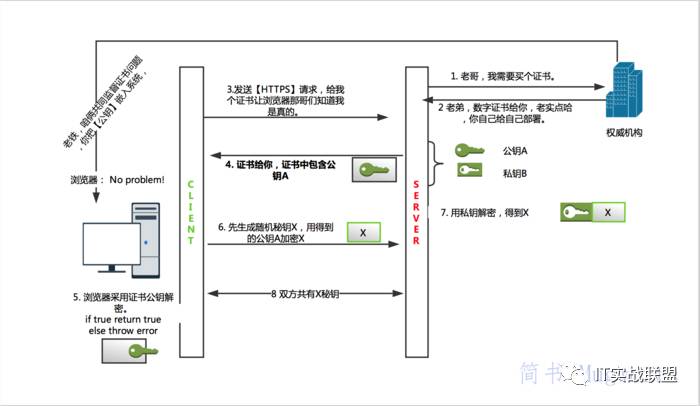
SSL/TLS协议的基本过程是这样的:
(1) 客户端向服务器端索要并验证公钥。
(2) 双方协商生成"对话密钥"。
(3) 双方采用"对话密钥"进行加密通信。
目标:使用OpenSSL生成一个CA根证书,并用这个根证书颁发两个子证书server和client。
第二部分 生成证书相关文件
2.1 确保安装OpenSSL
Mac已经安装OpenSSL,可以采用brew info OpenSSL来查看具体内容;
linux 可以采用yum install openssl来进行下载;
2.2 构建私钥
OpenSSL通常使用PEM(Privacy Enbanced Mail)格式来保存私钥,构建私钥的命令如下:
#导出至为当前路径
openssl genrsa -out private.pem 1024
参数说明:
1. genrsa——使用RSA算法产生私钥
3. -out——输出文件的路径
4. 1024——指定私钥长度
2.3 生成CSR证书签名
使用上一步生成的私钥(pem文件),生成证书请求文件(csr文件):
#导出到同级目录下, -subj配置签名文件的说明,可根据具体情况做修改
openssl req -new -key private.pem -out csr.pem  -subj \
"/C=CN/ST=myprovince/L=mycity/O=myorganization/OU=mygroup/CN=myname"
参数说明
1. req——执行证书签发命令
2. -new——新证书签发请求
3. -key——指定私钥路径
4. -out——输出的csr文件的路径
5. -subj——证书相关的用户信息(subject的缩写)
2.4 自签发证书文件(cer文件)
openssl x509 -req -days 365 -sha1 -extensions v3_ca -signkey \
private.pem -in csr.pem -out ca.cer
参数说明:
1. x509——生成x509格式证书
2. -req——输入csr文件
3. -days——证书的有效期(天)
4. -sha1——证书摘要采用sha1算法
5. -extensions——按照openssl.cnf文件中配置的v3_ca项添加扩展
6. -signkey——签发证书的私钥
7. -in——要输入的csr文件
8. -out——输出的cer证书文件
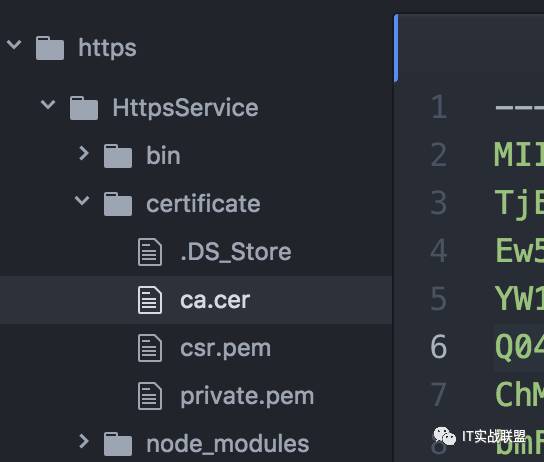
三个文件如下图:

文件列表
记得导入证书
第三部分 Node搭建https服务器
3.1 配置express项目
$ cd /Users/51testing/Desktop/https
$ express HttpsService
....
   install dependencies:
     $ cd HttpsService && npm install

   run the app:
     $ DEBUG=httpsservice:* npm start

$ cd HttpsService && npm install
.....
执行完毕后的目录如下:

目录
3.2 配置文件
创建目录certificate,将创建的文件拖入进去,

目录
3.3 编写代码
express默认采用http协议,在bin/www目录下配置入口文件;
我们在app.js文件中配置https服务器, nodejs默认存在http与https模块,直接引用即可.
#app.js中加入如下代码:

var app = express();

//使用nodejs自带的http、https模块
var https = require('https');
var http = require('http');
var fs = require('fs');

//根据项目的路径导入生成的证书文件
var privateKey  = fs.readFileSync(path.join(__dirname, './certificate/private.pem'), 'utf8');
var certificate = fs.readFileSync(path.join(__dirname, './certificate/ca.cer'), 'utf8');
var credentials = {key: privateKey, cert: certificate};

//创建http与HTTPS服务器
var httpServer = http.createServer(app);
var httpsServer = https.createServer(credentials, app);

//可以分别设置http、https的访问端口号
var PORT = 8000;
var SSLPORT = 8001;

//创建http服务器
httpServer.listen(PORT, function() {
    console.log('HTTP Server is running on: http://localhost:%s', PORT);
});

//创建https服务器
httpsServer.listen(SSLPORT, function() {
    console.log('HTTPS Server is running on: https://localhost:%s', SSLPORT);
});

//可以根据请求判断是http还是https
app.get('/', function (req, res) {
    if(req.protocol === 'https') {
        res.status(200).send('This is https visit!');
    }
    else {
        res.status(200).send('This is http visit!');
    }
});
3.4 验证
启动服务:
$ node bin/www
HTTP Server is running on: http://localhost:8000
HTTPS Server is running on: https://localhost:8001
******打开浏览器访问: https://localhost:8001

无法访问
******点击继续-高级--访问不安全链接:

不安全
******访问http服务器: http://localhost:8000

http
linux 配置 ---- 直接写nodejs代码
数字证书相关
~ openssl version -a
~ openssl genrsa -out privatekey.pem 1024
~ openssl req -new -key privatekey.pem -out certrequest.csr
~ openssl x509 -req -in certrequest.csr -signkey privatekey.pem -out certificate.pem
将之放在同级目录下:
//使用nodejs自带的http、https模块
var https = require('https');
var http = require('http');
var fs = require('fs');


var options = {
    key: fs.readFileSync('./privatekey.pem'),
    cert: fs.readFileSync('./certificate.pem')
};


//创建http与HTTPS服务器
var httpServer = http.createServer(function(req, res){
    res.end('This is http visit!');
    console.log('HTTP Server is running on:');
}).listen(3000);

var httpsServer = https.createServer(options, function(req, res){
    res.end('This is https visit!');
    console.log('HTTsssssssssssssss');
}).listen(3001);参考
注意:本文归作者所有,未经作者允许,不得转载
