你还在跟前端对接上花费很多的时间而没有效果吗?
你还在为写接口文档而烦恼吗?
今天就教大家一个接口对接神器 Swagger
Swagger 可以帮我们快速的展示接口的定义以及快速接口的调用测试
先让我们看下这个神器的真面目吧
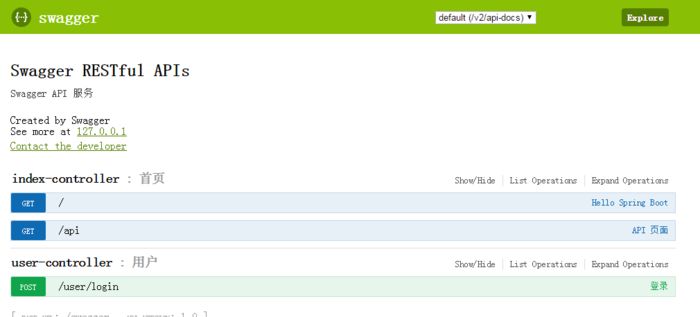
是不是发现都有哪些接口一目了然?
下面就让我们的项目集成上Swagger2吧
默认我们这些东西都是需要有的: Jdk1.6+,Maven
完整的目录结构如下图

目录结构
增加Maven 依赖
<?xml version="1.0" encoding="UTF-8"?><project xmlns="http://maven.apache.org/POM/4.0.0"         xmlns:xsi="http://www.w3.org/2001/XMLSchema-instance"         xsi:schemaLocation="http://maven.apache.org/POM/4.0.0 http://maven.apache.org/xsd/maven-4.0.0.xsd">
    <modelVersion>4.0.0</modelVersion>

    <groupId>com.example</groupId>
    <artifactId>spring-boot-swagger</artifactId>
    <version>1.0-SNAPSHOT</version>
    <parent>
        <groupId>org.springframework.boot</groupId>
        <artifactId>spring-boot-starter-parent</artifactId>
        <version>1.5.1.RELEASE</version>
    </parent>

    <dependencies>
        <dependency>
            <groupId>org.springframework.boot</groupId>
            <artifactId>spring-boot-starter-web</artifactId>
        </dependency>

        <dependency>
            <groupId>io.springfox</groupId>
            <artifactId>springfox-swagger2</artifactId>
            <version>2.7.0</version>
        </dependency>
        <dependency>
            <groupId>io.springfox</groupId>
            <artifactId>springfox-swagger-ui</artifactId>
            <version>2.7.0</version>
        </dependency>
        <dependency>
            <groupId>org.apache.tomcat.embed</groupId>
            <artifactId>tomcat-embed-jasper</artifactId>
        </dependency>
        <!-- 打war包用 -->
        <dependency>
            <groupId>org.springframework.boot</groupId>
            <artifactId>spring-boot-starter-tomcat</artifactId>
            <scope>provided</scope>
        </dependency>
    </dependencies>
    <packaging>war</packaging>
    <!-- -->
    <properties>
        <java.version>1.8</java.version>
    </properties>
    <build>
        <!-- 打war包用 -->
        <finalName>swagger</finalName>
        <plugins>
            <plugin>
                <groupId>org.springframework.boot</groupId>
                <artifactId>spring-boot-maven-plugin</artifactId>
            </plugin>
            <!-- 打war包用,maven打包的时候告诉maven不需要web.xml,否刚会报找不到web.xml错误 -->
            <plugin>
                <groupId>org.apache.maven.plugins</groupId>
                <artifactId>maven-war-plugin</artifactId>
                <version>2.1.1</version>
                <configuration>
                    <failOnMissingWebXml>false</failOnMissingWebXml>
                </configuration>
            </plugin>
            <!-- -->
        </plugins>
    </build></project>
springfox-swagger2 是主要核心, springfox-swagger-ui 是官网提供的免费UI界面
增加Spring boot 入口
package com.example;
import org.springframework.boot.SpringApplication;
import org.springframework.boot.autoconfigure.SpringBootApplication;@SpringBootApplication

public class Application {
public static void main(String[] args) {
        SpringApplication.run(Application.class, args);
    }
}
```properties
server.port=8081
server.context-path=/swagger
swagger.enable=true使用注解配置Swagger
package com.example.configuration;
import org.springframework.beans.factory.annotation.Value;
import org.springframework.context.annotation.Bean;
import org.springframework.context.annotation.Configuration;
import springfox.documentation.builders.ApiInfoBuilder;
import springfox.documentation.builders.PathSelectors;
import springfox.documentation.builders.RequestHandlerSelectors;
import springfox.documentation.service.ApiInfo;
import springfox.documentation.service.Contact;
import springfox.documentation.spi.DocumentationType;
import springfox.documentation.spring.web.plugins.Docket;
import springfox.documentation.swagger2.annotations.EnableSwagger2;
import java.sql.Timestamp;
import java.util.Date;
@Configuration@EnableSwagger2
public class Swagger2Config {
public static final String BASE_PACKAGE = "com.example";
@Value("${swagger.enable}")
private boolean enableSwagger;
@Bean
    public Docket createRestApi() {
return new Docket(DocumentationType.SWAGGER_2)
                .apiInfo(apiInfo())                // 生产环境的时候关闭 swagger 比较安全
                .enable(enableSwagger)                //将Timestamp类型全部转为Long类型
                .directModelSubstitute(Timestamp.class, Long.class)                //将Date类型全部转为Long类型
                .directModelSubstitute(Date.class, Long.class)
                .select()                // 扫描接口的包路径,不要忘记改成自己的
                .apis(RequestHandlerSelectors.basePackage(BASE_PACKAGE))
                .paths(PathSelectors.any())
                .build();
    }    private ApiInfo apiInfo() {        return new ApiInfoBuilder()
                .title("Swagger RESTful APIs")
                .description("Swagger API 服务")
                .termsOfServiceUrl("http://swagger.io/")
                .contact(new Contact("Swagger", "127.0.0.1", "qiaohhgz@163.com"))
                .version("1.0")
                .build();
    }
}
正常项目上线后应该是关闭掉 swagger 的,所以这边增加了一个配置 enableSwagger
可以使用 directModelSubstitute 做一些期望的类型转换
增加两个Java 传输对象
package com.example.model;
import com.fasterxml.jackson.annotation.JsonIgnore;
import io.swagger.annotations.ApiModel;
import io.swagger.annotations.ApiModelProperty;@ApiModel("用户")
public class User {
@ApiModelProperty("编号")
private Long id;
@ApiModelProperty("用户名")
private String username;
@ApiModelProperty("姓")
private String firstName;
@ApiModelProperty("名")
private String lastName;
@ApiModelProperty("邮箱")
private String email;
@ApiModelProperty(hidden = true)// 密码不传输
    @JsonIgnore
    private String password;
@ApiModelProperty("状态")
private Integer userStatus;
// 省略了get set}
ApiModelProperty 只设置value 值的时候可以不写 value = ""
password 我们用了 JsonIgnore 和 hidden = true 设置,不希望密码传输到前端去
package com.example.model;
import io.swagger.annotations.ApiModelProperty;
public class UserForm {
@ApiModelProperty(value = "用户名", required = true, example = "admin")    private String username;
@ApiModelProperty(value = "密码", required = true, example = "000000")    private String password;    // 省略了get set}
使用 example 可以提供一些测试内容,方便测试
编写一个首页的Controller
package com.example.controller;
import io.swagger.annotations.Api;
import io.swagger.annotations.ApiOperation;
import org.springframework.web.bind.annotation.RequestMapping;
import org.springframework.web.bind.annotation.RequestMethod;
import org.springframework.web.bind.annotation.RestController;
import javax.servlet.http.HttpServletResponse;
import java.io.IOException;
@Api(value = "首页", description = "首页")
@RequestMapping("/")@RestController

public class IndexController {
@ApiOperation(value = "Hello Spring Boot", notes = "Hello Spring Boot")    @RequestMapping(value = "/", method = RequestMethod.GET)
public String index() {
return "Hello Spring Boot";
    }
@ApiOperation(value = "API 页面", notes = "接口列表")
 @RequestMapping(value = "/api", method = RequestMethod.GET)
 public void api(HttpServletResponse response) throws IOException {
        response.sendRedirect("swagger-ui.html");
    }
}
为了方便访问swagger ui 页面,我们做了一个重定向 api 更方便些
再来一个常用的简单登录Controller
package com.example.controller;
import com.example.model.User;
import com.example.model.UserForm;
import io.swagger.annotations.Api;
import io.swagger.annotations.ApiOperation;
import io.swagger.annotations.ApiResponse;
import io.swagger.annotations.ApiResponses;
import org.springframework.http.HttpStatus;
import org.springframework.http.ResponseEntity;
import org.springframework.web.bind.annotation.RequestBody;
import org.springframework.web.bind.annotation.RequestMapping;
import org.springframework.web.bind.annotation.RequestMethod;
import org.springframework.web.bind.annotation.RestController;
@Api(value = "用户", description = "用户")
@RequestMapping("/user")
@RestController

public class UserController {
@ApiOperation(value = "登录", notes = "输入用户名和密码登录")
@ApiResponses(value = {
@ApiResponse(code = 200, message = "OK", response = User.class, responseContainer = "user"),
@ApiResponse(code = 405, message = "账号名或密码错误")
    })
@RequestMapping(value = "/login", produces = {"application/json"}, method = RequestMethod.POST)
ResponseEntity<User> login(@RequestBody UserForm form) {
if (!form.getPassword().equalsIgnoreCase("000000")) {
return ResponseEntity.status(HttpStatus.METHOD_NOT_ALLOWED).build();
        }
        User user = new User();
        user.setId(1L);
        user.setUsername(form.getUsername());
        user.setFirstName("小");
        user.setLastName("明");
        user.setEmail("xiaoming@mail.com");
        user.setUserStatus(1);        return ResponseEntity.ok(user);
    }
}
建议使用Spring的 ResponseEntity 类做统一的返回结果
swagger 对 response code 的支持还算好,我们可以把可能出现的异常代码都一一罗列出来,方便对接的时候对异常的处理
启动服务器,打开浏览器访问下吧
http://localhost:8081/swagger/api
使用说明
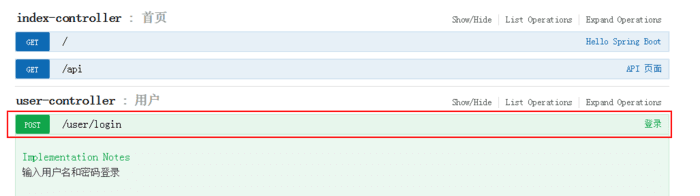
点击并查看接口
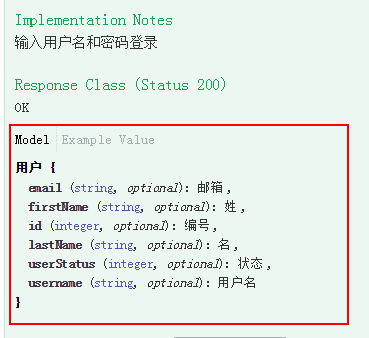
点击Model 查看返回内容的数据结构
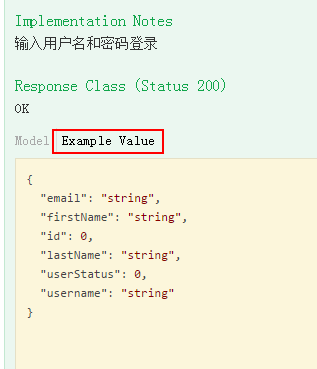
点击Example 查看案例数据
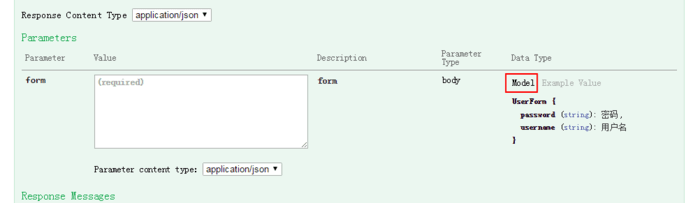
点击Model 查看请求数据结构
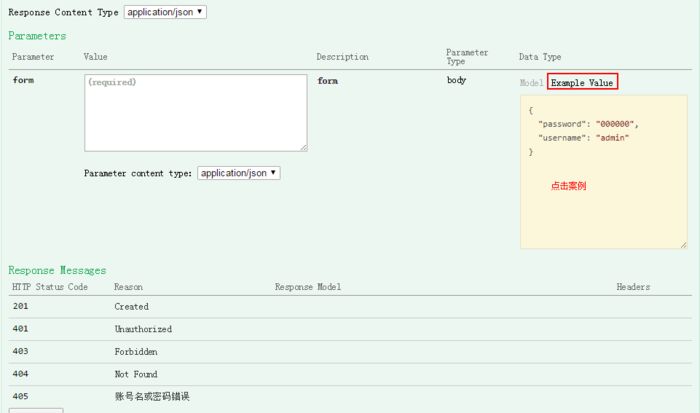
点击案例可以快速设置请求内容
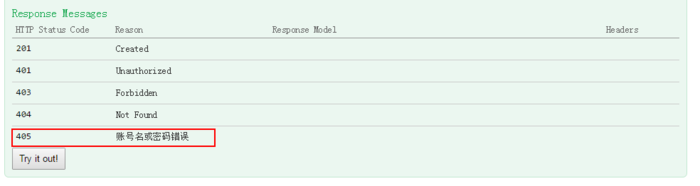
查看并处理异常code的描述

点击Try it out! 执行并查看结果
就这么简单!你学会了吗?
更多精彩内容请关注“IT实战联盟”公众号哦~~~
注意:本文归作者所有,未经作者允许,不得转载