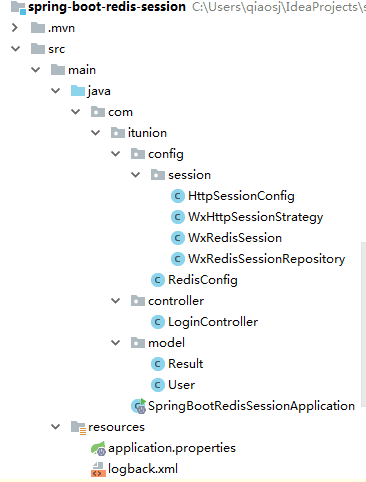
项目整体结构
一、maven 依赖
这边依赖的是spring boot 1.5.10 版本,2.x的版本session方法有做修改,不过用法没变
<?xml version="1.0" encoding="UTF-8"?><project xmlns="http://maven.apache.org/POM/4.0.0" xmlns:xsi="http://www.w3.org/2001/XMLSchema-instance"         xsi:schemaLocation="http://maven.apache.org/POM/4.0.0 http://maven.apache.org/xsd/maven-4.0.0.xsd">
    <modelVersion>4.0.0</modelVersion>

    <groupId>com.itunion</groupId>
    <artifactId>spring-boot-redis-session</artifactId>
    <version>0.0.1-SNAPSHOT</version>
    <packaging>jar</packaging>

    <name>spring-boot-redis-session</name>
    <description>spring boot redis session</description>

    <parent>
        <groupId>org.springframework.boot</groupId>
        <artifactId>spring-boot-starter-parent</artifactId>
        <version>1.5.10.RELEASE</version>
        <relativePath/> <!-- lookup parent from repository -->
    </parent>

    <properties>
        <project.build.sourceEncoding>UTF-8</project.build.sourceEncoding>
        <project.reporting.outputEncoding>UTF-8</project.reporting.outputEncoding>
        <java.version>1.8</java.version>
    </properties>

    <dependencies>
        <dependency>
            <groupId>org.springframework.boot</groupId>
            <artifactId>spring-boot-starter-web</artifactId>
        </dependency>
        <dependency>
            <groupId>org.springframework.session</groupId>
            <artifactId>spring-session-data-redis</artifactId>
        </dependency>

        <dependency>
            <groupId>org.springframework.boot</groupId>
            <artifactId>spring-boot-devtools</artifactId>
            <scope>runtime</scope>
        </dependency>
    </dependencies>

    <build>
        <plugins>
            <plugin>
                <groupId>org.springframework.boot</groupId>
                <artifactId>spring-boot-maven-plugin</artifactId>
            </plugin>
        </plugins>
    </build></project>
二、配置内容
默认给项目配置的是debug级别的日志,如果不需要看到可以修改成info或者error
spring.redis.host=localhost
spring.redis.port=6379
spring.redis.password=
spring.redis.database=0

logging.level.root=info
logging.level.com.itunion=debug
三、程序入口
package com.itunion;
import org.springframework.boot.SpringApplication;
import org.springframework.boot.autoconfigure.SpringBootApplication;
@SpringBootApplicationpublic class SpringBootRedisSessionApplication {
    public static void main(String[] args) {
        SpringApplication.run(SpringBootRedisSessionApplication.class, args);
    }
}
四、实体类
用户类字段简单写了几个,昵称,从哪里登录的,会话编号token
package com.itunion.model;
import java.io.Serializable;
public class User implements Serializable {
    private String nickName;
    private String loginBy;
    private String token;
    public User(String nickName, String loginBy, String token) {            this.nickName = nickName;
        this.loginBy = loginBy;
        this.token = token;
    }
    // 省略get , set 方法
    @Override
    public String toString() {
        return "User{" +                "nickName='" + nickName + '\'' +                ", loginBy='" + loginBy + '\'' +                ", token='" + token + '\'' +                '}';
    }
}
五、登录控制层
模拟了普通的账号密码登录,微信code方式登录,从session中获取用户信息,退出登录接口
登录成功需要把sessionId 返回到前端,退出需要调用session的invalidate 方法
package com.itunion.controller;
import com.itunion.model.Result;
import com.itunion.model.User;
import org.springframework.beans.factory.annotation.Autowired;
import org.springframework.web.bind.annotation.GetMapping;
import org.springframework.web.bind.annotation.RequestMapping;
import org.springframework.web.bind.annotation.RequestParam;
import org.springframework.web.bind.annotation.RestController;
import javax.servlet.http.HttpSession;
@RestController@RequestMappingpublic class LoginController {
@Autowired
    private HttpSession session;
    // 账号密码登录
    @GetMapping(value = "login")
    public Result login(@RequestParam String username, @RequestParam String password) {
        System.out.println("login username = [" + username + "], password = [" + password + "]");
        User user = new User(username, "app", session.getId());
        session.setAttribute("user", user);
        // 这里记得把会话ID返回到前端,前端之后请求都需要携带该ID, 可以封装到对象中
        return new Result<>(user);
    }
    // 微信登录
    @GetMapping(value = "loginByWx")
    public Result loginByWx(@RequestParam String code) {
        System.out.println("loginByWx.code = [" + code + "]");                // 调用微信API获取OpenId等信息
        User user = new User("Jim", "weixin", session.getId());
        session.setAttribute("user", user);
        return new Result<>(user);
    }
    // 退出
    @GetMapping(value = "logout")
    public Result logout() {
        System.out.println("logout");
        // session 设置为无效的
        session.invalidate();
    return new Result();
    }
    // 使用会话中的信息
    @GetMapping(value = "hello")
    public Result<User> hello() {
        User user = (User) session.getAttribute("user");
        System.out.println("hello " + user.toString());
        return new Result<>(user);
    }
}
六、实现ExpiringSession会话类
因为 SessionRepositoryFilter 拦截器自动注入的是 ExpiringSession 类型的Session 如果你只是实现了Session接口将会报错,所以这边实现的 ExpiringSession 接口
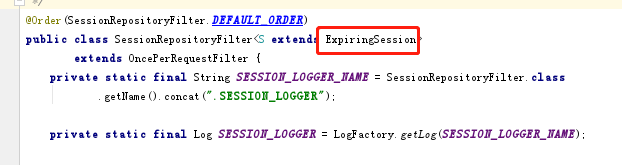
又因为 redis 会自动销毁 session ,所以不需要对time相关方法做具体实现
同时用JsonIgnore 忽略不需要序列化的字段防止反序列化失败
package com.itunion.config.session;
import com.fasterxml.jackson.annotation.JsonIgnore;
import org.springframework.session.ExpiringSession;
import java.io.Serializable;
import java.util.HashMap;import java.util.Map;
import java.util.Set;
import java.util.UUID;
/** * 因为Filter 拦截器自动注入的是 ExpiringSession 类型的Session * 所以这边实现的 ExpiringSession 方法可以不用管,用JsonIgnore 忽略防止反序列化失败 */
public class WxRedisSession implements ExpiringSession, Serializable {
    private String id;
    private Map<String, Object> sessionAttrs = new HashMap<String, Object>();
    public WxRedisSession() {
        this(UUID.randomUUID().toString().replace("-", ""));
    }
    public WxRedisSession(String id) {
        this.id = id;
    }
    @Override
    public String getId() {
        return id;
    }

    @Override
    public <T> T getAttribute(String attributeName) {
        return (T) this.sessionAttrs.get(attributeName);
    }
    @JsonIgnore
    @Override
    public Set<String> getAttributeNames() {
        return this.sessionAttrs.keySet();
    }
    @Override
    public void setAttribute(String attributeName, Object attributeValue) {
        if (attributeValue == null) {
            removeAttribute(attributeName);
        } else {
            this.sessionAttrs.put(attributeName, attributeValue);
        }
    }
    @Override
    public void removeAttribute(String attributeName) {
        this.sessionAttrs.remove(attributeName);
    }
    public void setId(String id) {
        this.id = id;
    }
    //   反序列化需要用到get set方法
    public Map<String, Object> getSessionAttrs() {
        return sessionAttrs;
    }
    public void setSessionAttrs(Map<String, Object> sessionAttrs) {        this.sessionAttrs = sessionAttrs;
    }
    // redis 会自动销毁 session ,所以不需要使用下面的方法
    @JsonIgnore
    @Override
    public long getCreationTime() {
        return 0;
    }
    @JsonIgnore
    @Override
    public void setLastAccessedTime(long lastAccessedTime) {
    }
    @JsonIgnore
    @Override
    public long getLastAccessedTime() {
        return 0;
    }
    @JsonIgnore
    @Override
    public void setMaxInactiveIntervalInSeconds(int interval) {
    }
    @JsonIgnore
    @Override
    public int getMaxInactiveIntervalInSeconds() {
        return 0;
    }
    @JsonIgnore
    @Override
    public boolean isExpired() {
        return false;
    }
}
七、实现SessionRepository接口会话持久层
这个类主要就是通过RedisTemplate 这个类对session对象的保存、修改、删除等操作
package com.itunion.config.session;
import org.slf4j.Logger;
import org.slf4j.LoggerFactory;
import org.springframework.data.redis.core.RedisTemplate;
import org.springframework.session.ExpiringSession;
import org.springframework.session.SessionRepository;
import java.util.concurrent.TimeUnit;
/** * 主要用来管理session对象 */

public class WxRedisSessionRepository implements SessionRepository<WxRedisSession> {
    private static Logger log = LoggerFactory.getLogger(WxRedisSessionRepository.class);
    // redis 连接工具
    private RedisTemplate<String, Object> redisTemplate;
    /**     * 如果不为空,将覆盖默认的超时时间,单位秒     * {@link ExpiringSession#setMaxInactiveIntervalInSeconds(int)}.     */
    private Integer defaultMaxInactiveInterval;
    public WxRedisSessionRepository(RedisTemplate<String, Object> redisTemplate) {
        this.redisTemplate = redisTemplate;
    }
    public WxRedisSessionRepository(RedisTemplate<String, Object> redisTemplate, Integer defaultMaxInactiveInterval) {
        this.redisTemplate = redisTemplate;
        this.defaultMaxInactiveInterval = defaultMaxInactiveInterval;
    }

    @Override
    public WxRedisSession createSession() {
        WxRedisSession session = new WxRedisSession();
        log.debug("createSession " + session.getId());
        return session;
    }

    @Override
    public void save(WxRedisSession session) {
        log.debug("save " + session.getId());
        redisTemplate.opsForValue().set(session.getId(), session, defaultMaxInactiveInterval, TimeUnit.SECONDS);
    }

    @Override
    public WxRedisSession getSession(String id) {
        log.debug("getSession " + id);
        if (redisTemplate.hasKey(id)) {
            return (WxRedisSession) redisTemplate.opsForValue().get(id);
        } else {
            return null;
        }
    }

    @Override
    public void delete(String id) {
        log.debug("delete " + id);
        redisTemplate.delete(id);
    }
    public void setDefaultMaxInactiveInterval(Integer defaultMaxInactiveInterval) {
        this.defaultMaxInactiveInterval = defaultMaxInactiveInterval;
    }
}
八、自定义会话策略 HttpSessionStrategy
这个类可以理解为一个请求过来了,程序从哪里去拿我需要的会话编号,主要用到的方法就是 getRequestedSessionId
package com.itunion.config.session;
import org.springframework.session.Session;
import org.springframework.session.web.http.HttpSessionStrategy;
import javax.servlet.http.HttpServletRequest;
import javax.servlet.http.HttpServletResponse;
// 会话策略, 比如会话的标识从哪里获取
public class WxHttpSessionStrategy implements HttpSessionStrategy {      private String name;
        public WxHttpSessionStrategy() {
        this("token");
    }
    public WxHttpSessionStrategy(String name) {
        this.name = name;
    }
    @Override
    public String getRequestedSessionId(HttpServletRequest request) {        // 从header 中获取
        String token = request.getHeader(name);
        if (token != null) return token;
        // 从请求参数中获取
        token = request.getParameter(name);
        if (token != null) return token;
        // 增加自己的获取方式 比如:cookie
        return null;
    }
    @Override
    public void onNewSession(Session session, HttpServletRequest request, HttpServletResponse response) {
        response.setHeader(this.name, session.getId());
    }
    @Override
    public void onInvalidateSession(HttpServletRequest request, HttpServletResponse response) {
        response.setHeader(this.name, "");
    }
    public void setName(String name) {
        this.name = name;
    }
}
九、Redis 配置
这里我重新设置 StringRedisTemplate 值的序列化方式,把value内容序列化为json字符串
如果你希望只保存字符串的内容,可以只返回StringRedisTemplate对象
package com.itunion.config;
import com.fasterxml.jackson.annotation.JsonAutoDetect;
import com.fasterxml.jackson.annotation.PropertyAccessor;
import com.fasterxml.jackson.databind.ObjectMapper;
import org.springframework.beans.factory.annotation.Value;
import org.springframework.context.annotation.Bean;
import org.springframework.context.annotation.Configuration;
import org.springframework.data.redis.connection.RedisConnectionFactory;
import org.springframework.data.redis.connection.jedis.JedisConnectionFactory;
import org.springframework.data.redis.core.RedisTemplate;
import org.springframework.data.redis.core.StringRedisTemplate;
import org.springframework.data.redis.serializer.Jackson2JsonRedisSerializer;
@Configurationpublic class RedisConfig {
    @Value("${spring.redis.host}")
    private String host;
    @Value("${spring.redis.port}")
    private Integer port;
    @Value("${spring.redis.password}")
    private String password;
    @Value("${spring.redis.database}")
    private Integer database;    @Bean
    RedisTemplate<String, Object> redisTemplate(RedisConnectionFactory connectionFactory) {
        RedisTemplate redisTemplate = new StringRedisTemplate(connectionFactory);
        // 重新设置 StringRedisTemplate 值的序列化方式,把value内容序列化为json字符串
        // 如果你希望只保存字符串的内容,可以吧下面的内容去掉只用StringRedisTemplate
        Jackson2JsonRedisSerializer<Object> redisSerializer = new Jackson2JsonRedisSerializer<>(Object.class);
        ObjectMapper om = new ObjectMapper();
        om.setVisibility(PropertyAccessor.ALL, JsonAutoDetect.Visibility.ANY);
        om.enableDefaultTyping(ObjectMapper.DefaultTyping.NON_FINAL);
        redisSerializer.setObjectMapper(om);
        redisTemplate.setValueSerializer(redisSerializer);
        // 应用设置
        redisTemplate.afterPropertiesSet();
        return redisTemplate;
    }
    @Bean
    RedisConnectionFactory connectionFactory() {
    // 建立redis 连接
        JedisConnectionFactory factory = new JedisConnectionFactory();
        factory.setHostName(host);
        factory.setPort(port);
        factory.setPassword(password);
        factory.setDatabase(database);
        return factory;
    }
}
十、启用配置
这里需要使用 @EnableSpringHttpSession 注解
package com.itunion.config.session;
import org.springframework.context.annotation.Bean;
import org.springframework.context.annotation.Configuration;
import org.springframework.data.redis.core.RedisTemplate;
import org.springframework.session.config.annotation.web.http.EnableSpringHttpSession;
import org.springframework.session.web.http.HttpSessionStrategy;
@Configuration@EnableSpringHttpSessionpublic class HttpSessionConfig {
//session策略,这里默认会从头部,请求参数中获取内容
// 这里的token 可以自定义,主要用于请求参数的名字
@Bean
HttpSessionStrategy httpSessionStrategy() {
return new WxHttpSessionStrategy("token");
}
@Bean
WxRedisSessionRepository sessionRepository(RedisTemplate redisTemplate) {
return new WxRedisSessionRepository(redisTemplate, 3600);
}
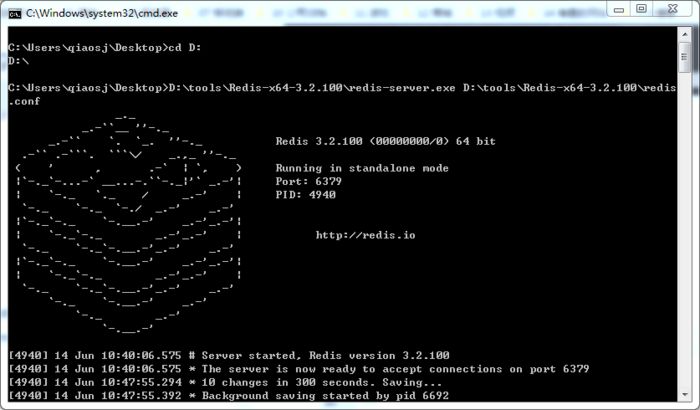
}启动Redis服务
启动项目
模拟移动端测试
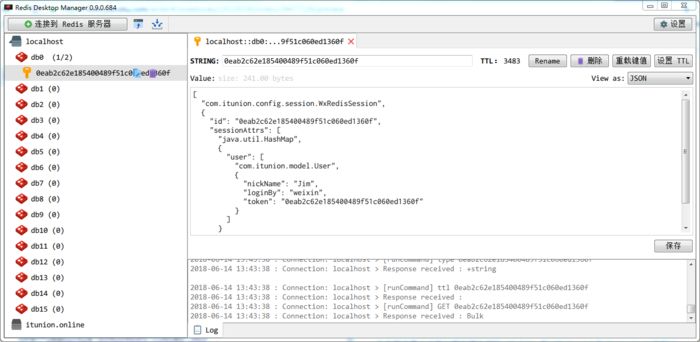
模拟登录操作 http://localhost:8080/loginByWx?code=123
{
    "code":100,"message":null,"result":{"nickName":"Jim","loginBy":"weixin","token":"0eab2c62e185400489f51c060ed1360f"},"timestamp":1528954812490}
看下redis 的数据
模拟普通请求
token参数要取登录成功返回的token值
http://localhost:8080/hello?token=0eab2c62e185400489f51c060ed1360f
模拟退出
http://localhost:8080/logout?token=0eab2c62e185400489f51c060ed1360f
redis 中对应的token也会被删除
总结
在本篇文章当中我们看到原先写的 HttpFilter 和 HttpServlet 在 Spring boot 中可以方便快捷的配置进来,对于我们老的项目的支持还是不错的
更多精彩内容
架构实战篇(一):Spring Boot 整合MyBatis
架构实战篇(二):Spring Boot 整合Swagger2
架构实战篇(三):Spring Boot 整合MyBatis(二)
架构实战篇(四):Spring Boot 整合 Thymeleaf
架构实战篇(五):Spring Boot 表单验证和异常处理
架构实战篇(六):Spring Boot RestTemplate的使用
架构实战篇(七):Spring Boot Data JPA 快速入门
架构实战篇(八):Spring Boot 集成 Druid 数据源监控
关注我们
Git源码地址:https://github.com/qiaohhgz/spring-boot-redis-session.git

注意:本文归作者所有,未经作者允许,不得转载