Druid 简介
Druid 是阿里巴巴开源的数据库连接池,提供了优秀的对数据库操作的监控功能
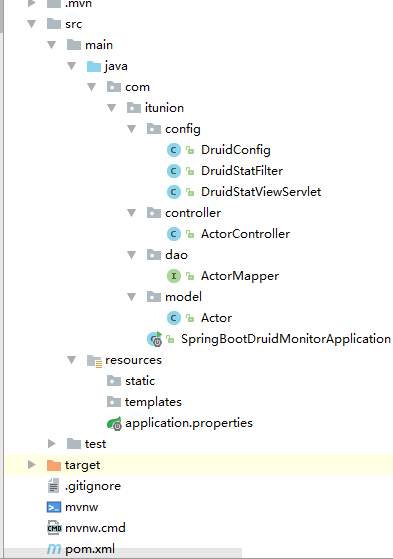
项目整体结构

项目整体结构
主要使用了 Druid 数据源、JPA、MySQL
一、maven 依赖
<?xml version="1.0" encoding="UTF-8"?><project xmlns="http://maven.apache.org/POM/4.0.0" xmlns:xsi="http://www.w3.org/2001/XMLSchema-instance"    xsi:schemaLocation="http://maven.apache.org/POM/4.0.0 http://maven.apache.org/xsd/maven-4.0.0.xsd">
    <modelVersion>4.0.0</modelVersion>

    <groupId>com.itunion</groupId>
    <artifactId>spring-boot-druid-monitor</artifactId>
    <version>0.0.1-SNAPSHOT</version>
    <packaging>jar</packaging>

    <name>spring-boot-druid-monitor</name>
    <description>Demo project for Spring Boot</description>

    <parent>
        <groupId>org.springframework.boot</groupId>
        <artifactId>spring-boot-starter-parent</artifactId>
        <version>1.5.10.RELEASE</version>
        <relativePath/> <!-- lookup parent from repository -->
    </parent>

    <properties>
        <project.build.sourceEncoding>UTF-8</project.build.sourceEncoding>
        <project.reporting.outputEncoding>UTF-8</project.reporting.outputEncoding>
        <java.version>1.7</java.version>
    </properties>

    <dependencies>
        <!-- https://mvnrepository.com/artifact/com.alibaba/druid -->
        <dependency>
            <groupId>com.alibaba</groupId>
            <artifactId>druid</artifactId>
            <version>1.0.27</version>
        </dependency>
        <dependency>
            <groupId>org.springframework.boot</groupId>
            <artifactId>spring-boot-configuration-processor</artifactId>
            <optional>true</optional>
        </dependency>

        <dependency>
            <groupId>org.springframework.boot</groupId>
            <artifactId>spring-boot-starter-data-jpa</artifactId>
        </dependency>
        <dependency>
            <groupId>org.springframework.boot</groupId>
            <artifactId>spring-boot-starter-web</artifactId>
        </dependency>

        <dependency>
            <groupId>org.springframework.boot</groupId>
            <artifactId>spring-boot-devtools</artifactId>
            <scope>runtime</scope>
        </dependency>
        <dependency>
            <groupId>mysql</groupId>
            <artifactId>mysql-connector-java</artifactId>
            <scope>runtime</scope>
        </dependency>
        <dependency>
            <groupId>org.springframework.boot</groupId>
            <artifactId>spring-boot-starter-test</artifactId>
            <scope>test</scope>
        </dependency>
    </dependencies>

    <build>
        <plugins>
            <plugin>
                <groupId>org.springframework.boot</groupId>
                <artifactId>spring-boot-maven-plugin</artifactId>
            </plugin>
        </plugins>
    </build></project>
二、配置内容
# 端口号
server.port=8080
# 数据源连接
druid.driver-class-name=com.mysql.jdbc.Driver
druid.url=jdbc:mysql://localhost:3306/sakiladruid.username=root
druid.password=root
# 连接池配置
druid.initial-size=1
druid.min-idle=1
druid.max-active=8
druid.max-wait=60000
druid.login-timeout=30
druid.query-timeout=30
# 开启哪些拦截器 stat:性能监控,wall: 防火墙控制
druid.filters=stat,wall,log4j
# 自定义数据源类型
spring.datasource.type=com.alibaba.druid.pool.DruidDataSource
# JPA 配置
spring.jpa.generate-ddl=truespring.jpa.hibernate.ddl-auto=none
spring.jpa.database=mysql
spring.jpa.database-platform=org.hibernate.dialect.MySQL5InnoDBDialect
spring.jpa.show-sql=truespring.jpa.open-in-view=false
三、程序入口
package com.itunion;
import org.springframework.boot.SpringApplication;
import org.springframework.boot.autoconfigure.SpringBootApplication;
import org.springframework.boot.web.servlet.ServletComponentScan;
import org.springframework.boot.web.support.SpringBootServletInitializer;@SpringBootApplication@ServletComponentScan
// 扫描项目下面的 @WebFilter 和 @WebServlet
public class SpringBootDruidMonitorApplication extends SpringBootServletInitializer {
public static void main(String[] args) {
        SpringApplication.run(SpringBootDruidMonitorApplication.class, args);
    }
}
这里使用了 @ServletComponentScan 注解,扫描并加载项目中使用了 @WebFilter 和 @WebServlet 注解的类
四、实体类
package com.itunion.model;
import java.persistence.*;
import java.o.Serializable;
import java.util.Date;@Entity@Table(name = "actor")
public class Actor implements Serializable {
@Id
    @GeneratedValue(strategy = GenerationType.IDENTITY)
@Column(nullable = false, updatable = false)
private Integer actorId;
@Column(nullable = false)
private String firstName;
@Column(nullable = false)
private String lastName;
@Column(nullable = false)
private Date lastUpdate;    // get set}
五、druid 数据源配置
package com.itunion.config;
import com.alibaba.druid.pool.DruidDataSource;
import org.springframework.beans.factory.annotation.Value;
import org.springframework.boot.context.properties.ConfigurationProperties;
import org.springframework.context.annotation.Bean;
import org.springframework.context.annotation.Configuration;
import java.sql.SQLException;
@Configuration
public class DruidConfig {
@Value("${druid.filters}")
private String filters;
@Bean
    @ConfigurationProperties(prefix = "druid")
public DruidDataSource dataSource() throws SQLException {
        DruidDataSource druidDataSource = new DruidDataSource();
        druidDataSource.setFilters(filters);
return druidDataSource;
    }
}
六、druid 过滤器
package com.itunion.config;import com.alibaba.druid.support.http.WebStatFilter;import javax.servlet.annotation.WebFilter;import javax.servlet.annotation.WebInitParam;

@WebFilter(filterName = "druidStatFilter", urlPatterns = "/*", asyncSupported = true,
        initParams = {
                @WebInitParam(name = "exclusions", value = "/static/*,*.js,*.gif,*.jpg,*.png,*.css,*.ico,/monitor/druid/*")//忽略资源
        }
)
public class DruidStatFilter extends WebStatFilter {

}
七、Druid stat 监控
package com.itunion.config;import com.alibaba.druid.support.http.StatViewServlet;import javax.servlet.annotation.WebInitParam;import javax.servlet.annotation.WebServlet;

@WebServlet(urlPatterns = "/monitor/druid/*", asyncSupported = true,
        initParams = {
                @WebInitParam(name = "allow", value = ""),
                @WebInitParam(name = "deny", value = ""),
                @WebInitParam(name = "loginUsername", value = "admin"),
                @WebInitParam(name = "loginPassword", value = "123456")
        })
public class DruidStatViewServlet extends StatViewServlet {
}
八、持久层
package com.itunion.dao;import com.itunion.model.Actor;import org.springframework.data.jpa.repository.JpaRepository;public interface ActorMapper extends JpaRepository<Actor, Integer> {

}
九、Rest Controller
package com.itunion.controller;
import com.itunion.dao.ActorMapper;
import com.itunion.model.Actor;
import org.springframework.beans.factory.annotation.Autowired;
import org.springframework.data.domain.Page;
import org.springframework.data.domain.PageRequest;
import org.springframework.web.bind.annotation.RequestMapping;
import org.springframework.web.bind.annotation.RequestParam;
import org.springframework.web.bind.annotation.RestController;
import java.util.List;@RestController@RequestMapping("actor")
public class ActorController {    @Autowired
    private ActorMapper actorMapper;    @RequestMapping
    public List<Actor> list(@RequestParam(value = "p", required = false, defaultValue = "0") Integer page,                            @RequestParam(value = "r", required = false, defaultValue = "10") Integer rows) {
        Page<Actor> actors = actorMapper.findAll(new PageRequest(page, rows));
    return actors.getContent();
    }
}
十、测试
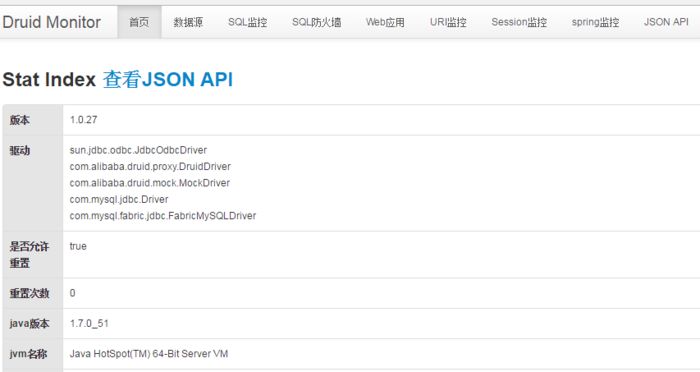
访问 http://localhost:8080/monitor/druid/login.html
输入 admin 123456 登录
看到这个页面说明成功了一半

首页
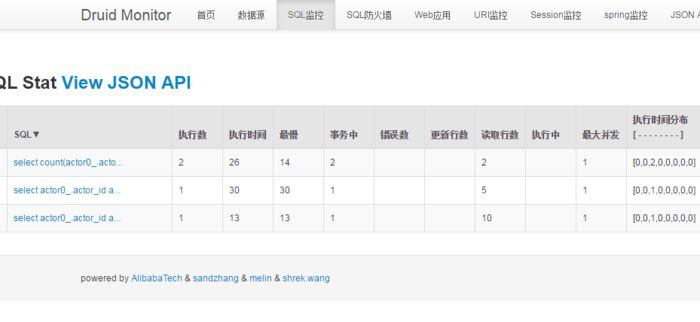
访问测试Rest 服务
http://localhost:8080/actor

SQL监控
看到你查询的记录时说明整体配置都OK了
总结
在本篇文章当中我们看到原先写的 HttpFilter 和 HttpServlet 在 Spring boot 中可以方便快捷的配置进来,对于我们老的项目的支持还是不错的
更多精彩内容
架构实战篇(一):Spring Boot 整合MyBatis
架构实战篇(二):Spring Boot 整合Swagger2
架构实战篇(三):Spring Boot 整合MyBatis(二)
架构实战篇(四):Spring Boot 整合 Thymeleaf
架构实战篇(五):Spring Boot 表单验证和异常处理
架构实战篇(六):Spring Boot RestTemplate的使用
架构实战篇(七):Spring Boot Data JPA 快速入门
关注我们
如果需要源码可以关注“IT实战联盟”公众号并留言(源码名称+邮箱),小萌看到后会联系作者发送到邮箱,也可以加入交流群和作者互撩哦~~~!

注意:本文归作者所有,未经作者允许,不得转载

