为了让API 能够更好的提供服务,表单数据验证和异常的处理是必不可少的,让我们来看看怎么处理才能让代码能够更好的解耦和扩展维护
为了节省篇幅,本节的代码是在《架构实战篇(二):Spring Boot 整合Swagger2》的基础上做的添加
1. 使用 @Valid 验证数据
为了接收前端传过来的请求参数(表单)我们创建一个Form结尾的数据类,并在必要的字段上增加 hibernate 的验证注解
package com.example.model;
import io.swagger.annotations.ApiModelProperty;
import org.hibernate.validator.constraints.NotEmpty;
public class UserForm {
@ApiModelProperty(value = "用户名", required = true, example = "admin")
@NotEmpty(message = "用户名不能为空")
private String username;
@ApiModelProperty(value = "密码", required = true, example = "000000")
@NotEmpty(message = "密码不能为空")
private String password;
// get set

}
接下来我们在 Rest API的入参地方增加上 @Valid 注解告诉Spring 这个入参的对象是需要验证的
一般情况下我们都会把数据的验证和正常逻辑都放在这里代码上会过于冗余,这里我们把数据验证和异常分离了出来,按照正常的逻辑返回一个用户(User)对象给请求端
package com.example.controller;
import com.example.exception.BusinessException;
import com.example.exception.UserNotFoundException;
import com.example.model.User;
import com.example.model.UserForm;
import io.swagger.annotations.*;
import org.springframework.web.bind.annotation.*;
import javax.validation.Valid;@Api(value = "用户", description = "用户")
@RequestMapping("/user")
@RestController
public class UserController {
@ApiOperation(value = "登录", notes = "输入用户名和密码登录")
@ApiResponses(value = {
@ApiResponse(code = 200, message = "OK", response = User.class, responseContainer = "user"),
@ApiResponse(code = 405, message = "用户名或者密码不存在")
    })
 @RequestMapping(value = "/login", produces = {"application/json"}, method = RequestMethod.POST)
 public User login(@Valid @RequestBody UserForm form) {
 if (!form.getPassword().equalsIgnoreCase("000000")) {
  // 使用默认的业务异常类,需要每次都填入消息
            throw new BusinessException(405, "用户名或者密码不存在");
        }
        User user = new User();
        user.setId(1L);
        user.setUsername(form.getUsername());
        user.setFirstName("小");
        user.setLastName("明");
        user.setEmail("xiaoming@mail.com");
        user.setUserStatus(1);        return user;
    }
@ApiOperation(value = "获取用户信息", notes = "获取用户信息")
@ApiResponses(value = {
@ApiResponse(code = 200, message = "OK", response = User.class, responseContainer = "user"),
@ApiResponse(code = 406, message = "用户不能存在")
    })
@GetMapping(value = "/info/{userId}")
public User getUserInfo(            @ApiParam(name = "userId", value = "用户编号", type = "path", defaultValue = "1000")            @PathVariable("userId") Integer userId) {
if (userId != 1000) {
// 自定义异常类可以出入需要的参数然后在异常处理里面做统一的处理
            throw new UserNotFoundException(userId);
        }
        User user = new User();
        user.setId(1000L);
        user.setUsername("1000");
        user.setFirstName("小");
        user.setLastName("明");
        user.setEmail("xiaoming@mail.com");
        user.setUserStatus(1);
        return user;
    }
}
在上面代码中我们定义了两个异常
BusinessException(使用默认的业务异常类,需要每次都填入消息)
UserNotFoundException(自定义异常类可以出入需要的参数然后在异常处理里面做统一的处理)
2. 使用 @RestControllerAdvice 解耦并处理异常
这里我们要分清'请求状态码'和'业务状态码'
HttpStatus 是请求状态码,是为了告诉请求端本次请求的一个状态
而我们下面 ErrorBody 的Code 是业务上自定义的状态吗,是为了告诉用户你请求成功了,但是业务处理上出错了
package com.example.exception;
import com.example.model.ErrorBody;
import org.springframework.http.HttpStatus;
import org.springframework.http.ResponseEntity;
import org.springframework.validation.BindingResult;
import org.springframework.validation.ObjectError;
import org.springframework.web.bind.MethodArgumentNotValidException;
import org.springframework.web.bind.annotation.ExceptionHandler;
import org.springframework.web.bind.annotation.RestControllerAdvice;
import java.util.List;
/** * Api 异常处理 */

@RestControllerAdvice
public class ApiExceptionHandler {
// 对表单验证时抛出的 MethodArgumentNotValidException 异常做统一处理

@ExceptionHandler(MethodArgumentNotValidException.class)
public ResponseEntity<?> validException(MethodArgumentNotValidException e) {
        BindingResult bindingResult = e.getBindingResult();
        List<ObjectError> errors = bindingResult.getAllErrors();
if (!errors.isEmpty()) {
        // 只显示第一个错误信息
        ErrorBody body = new ErrorBody(HttpStatus.BAD_REQUEST.value(), errors.get(0).getDefaultMessage());
        return new ResponseEntity<>(body, HttpStatus.BAD_REQUEST);
        }
        return new ResponseEntity<>("valid error", HttpStatus.BAD_REQUEST);
    }

// 业务异常的默认处理方式@ExceptionHandler(BusinessException.class)
public ResponseEntity<?> businessException(BusinessException e) {
        ErrorBody body = new ErrorBody(e.getCode(), e.getMessage());
        return new ResponseEntity<>(body, HttpStatus.BAD_REQUEST);
    }

// 代码异常的处理方式@ExceptionHandler(Exception.class)
public ResponseEntity<?> defaultHandler(Exception e) {
        ErrorBody body = new ErrorBody(HttpStatus.INTERNAL_SERVER_ERROR.value(), e.getMessage());
    return new ResponseEntity<>(body, HttpStatus.INTERNAL_SERVER_ERROR);
    }
}
package com.example.exception;
/** * 业务异常 */
public class BusinessException extends RuntimeException {
private Integer code;
public BusinessException(Integer code) {
this.code = code;
}
public BusinessException(Integer code, String message) {
super(message);
this.code = code;
}
// get set
}3. 自定义带参数异常
package com.example.exception;
public class UserNotFoundException extends BusinessException {
public UserNotFoundException(Integer userId) {
        super(406, "用户'" + userId + "'不存在");
    }
}
package com.example.model;
/** * 异常消息体 */
public class ErrorBody {
private Integer code;
private String message;
private long timestamp = System.currentTimeMillis();
public ErrorBody(Integer code, String message) {
this.code = code;
this.message = message;
}
// get set
}4. 测试异常处理
访问本地服务
http://localhost:8081/swagger/swagger-ui.html
测试下用户登录服务
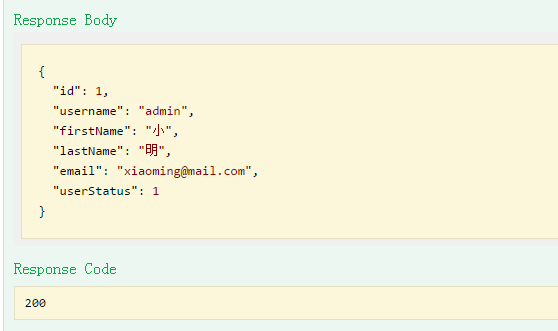
输入一个正确的内容,点击“Try it out"

正确的返回
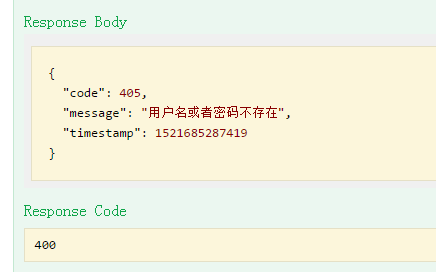
输入一个错误的内容,点击“Try it out"

错误的返回
这里我们注意看下Response Code 是 400 ,Response Body 里面的Code 是405
400 是告诉我们请求出错了,不会返回正确的User 对象了
405 是我们自定义的业务编码,调用端可以根据这个编码做一些处理
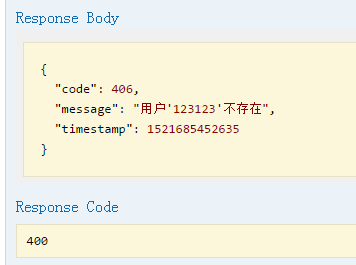
在测试下我们的带参数异常
输入一个错误的内容,点击“Try it out"
错误的返回
这里我们看到返回的message 中把我们请求时的用户名也包含在内了,减少了我们每次都拼接字符串的时间
预告下一节我们将分享如何使用Spring boot 调用其他Spring boot 提供的API 服务并友好的处理异常
关注我们
想要了解更多内容请关注“IT实战联盟”微信公众号!也可以留言和作者交流 获取源码哦!!!

注意:本文归作者所有,未经作者允许,不得转载
